I got thinking about insufficiently tough delphiniums and echinacea after I read Kelly Norris talking on his blog about the concept of provenance. The concept is pretty simple. Any given species of plant grows across a range of habitats and we refer to individual plants from different parts of the range as have different provenance. And provenance matters. To give an extreme example, Acer rubrum, the red maple, has a native range that stretches from frigid Maine right on down to sweltering Florida. They are all the same species, but individual trees can be very, very different depending on their provenance. A red maple from Maine can't survive Florida summers, and a Floridian red maple would collapse at the first hint of the Maine winter. Each local population of the species has evolved over time to match its local environment, gradually loosing or gaining heat or cold tolerance genes, slowly becoming better adapted to the climate and soil in one specific area and less adapted to different environments.
That is the real concept of provenance. I'm going to talk about something else all together and call it "breeder provenance" but you should be aware that I am completely making this term up.
The connection to real, biogeographical, provinance, however, is very close. Just as wild populations of a species become adapted to their local enviroment, cultivated plants, under the hands of plant breeders, become adapted to the environment where they were bred. These varieties develop a breeders provinance. Case in point: delphiniums. Delphiniums are, of course, almost obsenely lovely -- huge, lush spikes of rich, true blue. As a beginning gardener, I wanted to grow them rather desperately. Then I learned, the hard way, that in addition to being beautiful, they are drama queens. They demanding perfectly rich, moist soil, and miserably whimper away and die at the faintest hint of heat in the summer. Looking at my rows of corpses, I asked myself: Why is it that so many insanely beautiful things seem only willing to grow in England?
Pretty soon I learned the answer: Because they were bred in England. Or, in the case of some, the ever-mild West Coast. If you go back to the various wild species of delphiniums, they are far from all being cool-summer whimps. The stunning six-foot spires of Delphinium exaltatum, one of the species thought to be used in creating the modern hybrid delphiniums grow wild in the mountains of hot North Carolina. Another US native, Delphinium carolinianum, far from demanding cool, moist loam, grows wild all over the great plains and even down to the sand hills of Florida. Modern cultivated delphiniums are not such a pain to grow because that is how they have to be, rather, they have simply adapted over the years of breeding to the conditions where they have been bred: lush gardens in England and California. In other words, the breeders provinance is all wrong, and just like the red maples growing in New England, they've lost the ability to cope with the heat.
The same thing appears to be happening right now with the (formerly) tough-as-nails midwestern native, echinacea. In the wild quest for new colors and forms, the simple cone flower has moved out of the plains and into gardens and greenhouses. Instead of being forced to either cope with clay soil and hot summers or die, these new hybrids are luxuriating in rich, irrigated soil in places like The Netherlands and the Pacific Northwest, where summer heat is a mere figment of the imagination. Talented breeders there are producing an astonishing range of new varieties, while here it in the middle of the country, gardeners are snapping up the new lovely colors only to discover that many of them just don't have oomph of the old fashioned, plain pink varieties. It isn't that these breeders are doing anything wrong, it is simply a reality that you can't breed for heat tolerance without, well, heat.
That is part of the reason why I, as a plant breeder, and committed to not moving to the West Coast. I want to work in the midwest, breeding plants that are adapted to real weather. Right now I'm busy collecting up a bunch of non-wimpy delphinium species and can't wait to start crossing them together to form kick-ass, midwest-tough varieties. This is also the reason I like to keep talking on this blog about how easy plant breeding is, and how everyone ought to be doing it. The absolute best "breeders provenance" for a plant is your very own back yard. Let some of your favorite annuals self-sow, and each year they'll adjust more and more to your specific conditions. Make some tomato crosses, and see what performs -- and tastes -- best for you. Let all those breeders in Europe and the West Coast have their delicate drama queens, while we start creating great plants they'll wish they could grow.

Showing posts with label how to. Show all posts
Showing posts with label how to. Show all posts
22 November 2010
18 October 2010
The proper way to buy and plant bulbs
I shouldn't really say the "proper" way, as there really isn't a proper way to do anything in the garden. But, after a decade of experimentation, it is by far the best method I have found for dealing with the bewitching little things. You may have other methods, but I doubt any will be quite as effective as this one.

The first critical thing is to order them from catalogs. There are practical reasons for this (price, selection, quality) but the real, essential, reason is that you can do it curled up comfortably on your couch with a hot cup of tea, gleefully circling things -- SO much more pleasant than standing in a garden center looking at bins of bulbs. It is also critically important to order your bulbs are early in the year as possible, for a reason I will explain in a moment, and this can't be done at the garden center. So order from catalogs.
To order successfully, you need to do two things: Order a lot (roughly twice as much as any reasonable person would) and order from a really great catalog.
Choosing a great catalog is a matter of taste. There are many companies with excellent selections and prices, but when curled up on the couch circling things, what really matters most is how well they are written. Every year I also get catalogs from companies whose names I can't remember with extremely low prices and garish, horrible photographs that describe each and every variety as "Amazing!" These catalogs go straight into the trash. White Flower Farm is lovely, but over-priced and feels a bit snobbish without an extensive selection to back it up. Like a restaurant where you can't wear jeans, but the food isn't any better than the local diner. I always start to look through Brent and Becky's Bulbs, because they have a great selection, but the prose and photography are both so poor it kills the mood, leaving me to indulge in my long-time favorite, McClure and Zimmerman. No photos, which allows for more fun imagining things, and clear, simply worded descriptions. I read it over and over, making list after list of things I simply must have.
Once you have spent a few gleeful weeks looking over and re-looking over your order, circling this and that, imagining them all in the garden or in a vase, you finally place your order, and move on to the next critical step, which is:
Forget everything you ordered.
This is very hard to do, but very important. The first few years I gardened, I couldn't pull it off, but I've gradually become quite talented at it (I'm told it will only get easier as one gets older). I order as soon as possible and as much as possible, and once I'm done I throw myself into other gardening tasks and never, never, never look back at any bulb catalogs. As fall comes along, and you start seeing bulbs for sale at the grocery store, it is tempting to try and remember what you ordered, but resist! Keep thinking about asters and mums or your fall crop of lettuce and put bulbs out of your mind.
If you succeed, one day, you will find a big, surprisingly heavy box has arrived. You know it is full of bulbs but you don't know what bulbs they are. It is like Christmas, only better, because you needn't worry that you won't like it. You spent weeks picking them out, they are sure to be perfect, but what, oh what could they be?
My Big Box of Bulbs arrived last week and OH! It was exciting. I opened it carefully, then spent the next 10 minutes pulling out package after packaging and going "Princess Irene! OH! MORE Princess Irene! I LOVE her!" and "I can't believe I got SO MANY dwarf irises! I'm going to force a bunch of them. Oh my god! I got ANOTHER dozen of 'Harmony!'" and doing little happy dances all over the place. I didn't go quite so far as to kiss any of them, but I certainly thought about it. By the way, it is best, if possible, to do this alone. Non-gardening friends and relations who don't know that 'Princess Irene' is the most gorgeous tulip in the history of the world, a decidant orange shot with purple, won't understand the happy dances and tend to make unfortunant comments like, "How much did you SPEND on all of this?" and "Where are you going to plant them?" So, if at all possible, be alone. If not, simply ignore these comments. They are perfectly reasonable, and reasonable is the exact opposite of what you should be when dealing with bulbs.
Next, you plant them. All over the place. There is lots of good advice on planting bulbs, but it always leaves out the critical step necessary for a really successful bulb planting: Don't label them. If you MUST be organized (though I don't really advise it) you can write down what you planted where, but as soon as you do so be very sure to loose that piece of paper. Because, again, you now need to try very hard to forget everything you can. Spend the winter with seed catalogs and gardening books, thinking about tomato varieties and petunias. When spring finally arrives, you'll know there are great masses of crocuses and snowdrops and such around somewhere... but where exactly? Each warm day you can go out, carefully poking about here and there, giggling gleefully each time you find a little mass of green spikes showing through the soil. As the days warm, you'll constantly be surprised by little drifts of crocuses in full bloom. Daffodils will greet you in a corner you swear you never thought of. A thicket of tulips will errupt by the front stairs and one day reveal themselves to be 'Ballerina', the most lovely of the surpasingly elegant lily-flowered tulips, and you can sit down in delight staring at their slim, curved petals. As you are looking at them, the postman (or postwoman, as the case may be) will come by, holding a thick stack of catalogs and you can sit on the steps in the warm spring sun, and start dreaming of next year...
That is how your order bulbs. Or how you do it if you are not at all sensible. Sensible people, no doubt, do it very differently but I personally wouldn't be sensible about bulbs for anything.
01 August 2010
How (and why) to breed tomatoes in your backyard
Since I had the chance to talk about breeding tomatoes on last week's episode of The Splendid Table, I thought I'd follow up with instructions on how to create your own tomato variety. It is really easy, I promise. If you start your own tomatoes from seed, you can breed your own tomato variety -- and you totally should because it is freaking cool. Any gardener knows the thrill of picking that first tomato you grew yourself. Picking the first tomato of a variety you bred yourself multiplies that thrill a hundred times. Then you get to name it. And share it with friends, or pass it on to your children.
So how do you do it? Well, the basic process is to pick two or more tomato varieties you like for whatever reasons and make them have sex with each other. That combines and scrambles their genes, so when you grow a bunch of their children and grandchildren, you get all different combinations of their traits, from which you get the pick the new tomato you like best.
For example: I garden in the north with a short growing season, so is it is very important to me that my tomatoes start producing early. But a lot of early tomatoes aren't very tasty. To remedy that, I could cross a very early tomato with a very delicious tomato. Their children (called the F1 generation) will all have exactly half of their genes from their early mother, and half their genes from their delicious father, and so will all be essentially the same, and usually roughly half-way between their parents. Save seeds from those plants, and you get the F2 generation (the grandchildren of the original parent varieties), each of which will be a random mix of the genes of the two original parents.(for a more detailed explanation of F1 and F2 generations, see my explanation here). If you grow enough plants of that generation, you'll hopefully find a individual or two which combines the best traits of both their parents: delicious fruits produced early. You'll also get some which combine the worst of both worlds -- late, bland fruit -- as well as crazy, unexpected stuff. Genetics is way more complex than I'm going to get into in this little explanation, so crosses don't always do what you expect. Personally, I think that is half the fun. You plan the best you can, and then go with what pops out at you.
Once you find an individual plant in that F2 generation that you like, the next step is just to save seeds from that plant, and keep growing them out and picking your favorites for a few generations. Each year, you will see less and less variation in the plants you grow out from seed. After a few years, when all your seedlings are looking, growing, and tasting pretty much the same, you've got your new variety. Give it a name, collect a bunch of seeds, and share them with friends and family. And, if you are like me, start dreaming up what you could combine it with next to make it even more delicious, or a different shape, or bigger or smaller or... the sky is the limit.
If you are a gardener, the whole process is pretty much stuff you know how to do already: Grow seeds, taste test, pick your favorites. The only think you need to learn how to make the two original varieties have sex to produce that first hybrid generation and start the whole ball rolling.
Here is how.
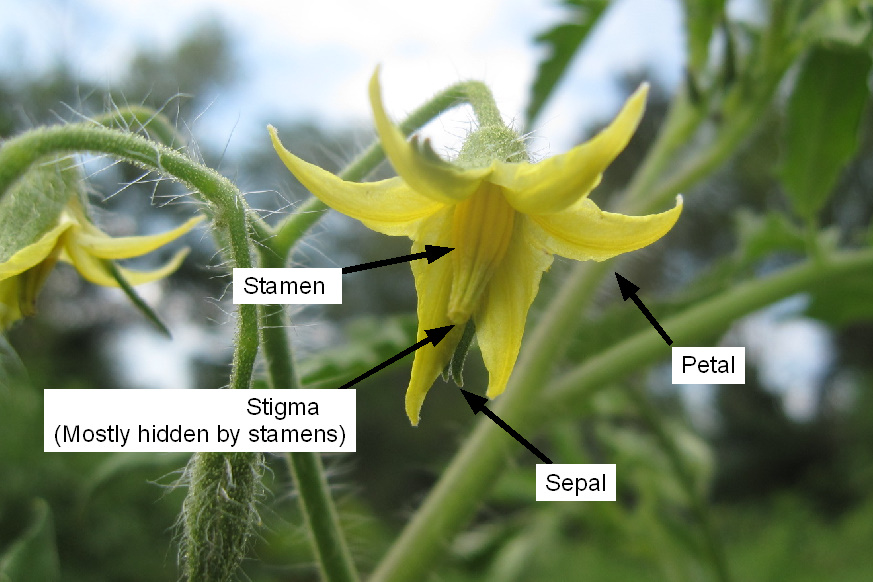
 Tomato sex is all about the flower. Each flower has several layers: Green sepals that protect the developing bud, within them, yellow petals that attract pollinators. In the middle, forming a yellow cone, are the stamens, the male part of the flower that produces pollen (pollen = plant sperm) and in the very center surrounded by the stamens, the stigma (female). Sex happens and seeds are produced when pollen from the stamens gets on the stigma. Tomatoes are a bit odd in that they usually self pollinate -- they have sex with themselves. Usually, pollen from the anthers just falls down onto the stigma of the same flower, and hey presto, you get seeds that have just one individual as both their mother and father. Sometimes bees will carry pollen from one flower to another and mix things up, but it is fairly unusual.
In order to make two different tomato plants get together and make hybrid babies, you first need to prevent the mother of your hybrid babies from having sex with itself. So find a flower bud just about to open:
 Using tweezers, carefully peal back the sepals and pull off the petals, to reveal the stamens. Those are the male parts of the flower, and they need to go. Hold the flower with one hand, and gently pinch and pull at the base of the stamens to peel them back to reveal the stigma hiding in the center of the flower.
 This can be tricky. Tomato flowers are delicate, and it is easy to damage it in the process. Some varieties are easier to work with than others, so if one plant is giving you trouble, try a different one and see if it is any easier.
Once the stamens are out of the way, find a fully open flower from the other parent of your cross, and pull off one or two of its stamens.
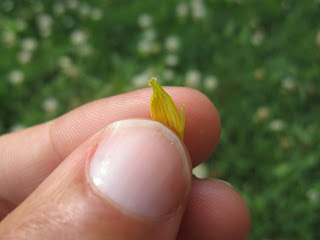 You don't need to worry about damaging this flower -- all you need is the pollen, so you can rip it apart as much as you want. Once you've got a stamen, run your tweezer tip along the little groove on the inside.
 You'll see a little tiny bit of powdery, yellow pollen collect on your tweezer. (Yes, it is there in the picture -- click to enlarge if you can't see it.)
Gently dab this pollen onto the tip of the stigma of the first flower
 (You can sing romatically or buzz like a bee as you do so, if you wish) and you have made your cross! Now just tie a string or something around it so you can find it again.
 If you did everything right, the flower will develop into a tomato fruit, full of your F1 hybrid seeds. If you don't get fruit and seeds, you probably damaged the flower while pulling off the stamens. I usually do two or three flowers at a time to make sure I get at least one good one. When the fruit is ripe, collect your seeds, grow them out, and see what wonderful things you have created!
So how do you do it? Well, the basic process is to pick two or more tomato varieties you like for whatever reasons and make them have sex with each other. That combines and scrambles their genes, so when you grow a bunch of their children and grandchildren, you get all different combinations of their traits, from which you get the pick the new tomato you like best.
For example: I garden in the north with a short growing season, so is it is very important to me that my tomatoes start producing early. But a lot of early tomatoes aren't very tasty. To remedy that, I could cross a very early tomato with a very delicious tomato. Their children (called the F1 generation) will all have exactly half of their genes from their early mother, and half their genes from their delicious father, and so will all be essentially the same, and usually roughly half-way between their parents. Save seeds from those plants, and you get the F2 generation (the grandchildren of the original parent varieties), each of which will be a random mix of the genes of the two original parents.(for a more detailed explanation of F1 and F2 generations, see my explanation here). If you grow enough plants of that generation, you'll hopefully find a individual or two which combines the best traits of both their parents: delicious fruits produced early. You'll also get some which combine the worst of both worlds -- late, bland fruit -- as well as crazy, unexpected stuff. Genetics is way more complex than I'm going to get into in this little explanation, so crosses don't always do what you expect. Personally, I think that is half the fun. You plan the best you can, and then go with what pops out at you.
Once you find an individual plant in that F2 generation that you like, the next step is just to save seeds from that plant, and keep growing them out and picking your favorites for a few generations. Each year, you will see less and less variation in the plants you grow out from seed. After a few years, when all your seedlings are looking, growing, and tasting pretty much the same, you've got your new variety. Give it a name, collect a bunch of seeds, and share them with friends and family. And, if you are like me, start dreaming up what you could combine it with next to make it even more delicious, or a different shape, or bigger or smaller or... the sky is the limit.
If you are a gardener, the whole process is pretty much stuff you know how to do already: Grow seeds, taste test, pick your favorites. The only think you need to learn how to make the two original varieties have sex to produce that first hybrid generation and start the whole ball rolling.
Here is how.
In order to make two different tomato plants get together and make hybrid babies, you first need to prevent the mother of your hybrid babies from having sex with itself. So find a flower bud just about to open:


Once the stamens are out of the way, find a fully open flower from the other parent of your cross, and pull off one or two of its stamens.


Gently dab this pollen onto the tip of the stigma of the first flower


01 September 2009
Let the bees do the breeding
 I learned to garden as a teenager by trail and error. Mostly error. But one early success came when I grew some violas from seed. A mix of colors, they flowered in the spring, limped through the summer, perked up in the fall. They grew and flowered, and I was delighted. Not dying was all I asked of plants.
But imagine my delight when they reappeared the next spring, not just not dead, but accompanied by a carpet of self-sown children. Given my garden budget at the time consisted of about $10 a month I greeted these free and effortless plants enthusiastically. Once they began flowering, I was amazed to discover each was different. Different colors, bicolors, tricolors, some with whiskers, some without, big flowers, small flowers. I picked my favorites, pulled out the ones I liked less, and next year up sprang the children of the favorites I had picked the year before.
 Each year the seedlings arrived healthier and more vigorous as natural selection picked the ones best adapted to my conditions, and each year I liked the colors more and more as my personal selection saved only the ones I liked best. I realized, with pleasure and pride, that what I now had was my very own strain of violas, uniquely adapted to my garden and my tastes -- created not with deep skill and expertise, but as a novice gardener who wasn't sure of the difference between an annual and perennial.
I subsequently lost that strain of violas (time spent over seas, most of the seeds saved mislaid during moves, and those I retained suffering an sad death during a bleak gardenless period living in an apartment) but I was reminded of that lovely, personal, serendipitous strain of violas by this comment about marigolds on Garden Rant. I wish I had seeds from that original strain, but it is never to late to do it again.
So I'm buying a lot of violas this fall. I'm going to plant them all over the garden, then wait for seedlings, and allow a new strain of MY violas to emerge.

My new camera should be arriving later this week!
13 March 2009
Starting seeds: About the seeds this time

I've been thinking a lot about seeds lately -- it is that time of year, so I thought I'd write a post about getting the things to germinate.
Vegetables and your standard annual flowers are simple to germinate -- get them wet and warm, and hay presto, they sprout, all at once, often within a week. That is because these plants have been bred to do that by us humans -- we like seeds that sprout as soon as we plant them, so we selected for varieties to germinate that way.
But in the wild, it doesn't work that way. Many seeds ripen and fall to the ground in the fall -- but it is better to wait until spring to sprout. Small seeds need to be close to the soil surface to survive -- if they try to sprout when buried too deep, they won't have the strength to reach the surface. Many plants spread their germination out over time -- if all the seeds sprout at once, they can all be killed off at once by a drought, hungry rabbit, or human with a hoe. So they use various method to keep their seeds dormant until just the right time. Here's how they do it, and how you convince them to germinate when you want them to.
Light:
Light is an important factor in the germination of a lot of seeds, most common being seeds that require light to germinate. These are usually very small seeds that can't push up from deep underground, so light signals that they are at the surface of the soil, where they can germinate and grow successfully. Incidentally, this is a way weeds persist in the ground for a long time. When you plow or till, weed seeds get buried, and then each time you turn the soil over, some are brought to the surface, are exposed to light and sprout.
For seed that aren't weeds, they are easiest to sprout by sprinkling them directly on the surface of your soil, and then lightly covering them with a sheet of plastic wrap until they get growing so they don't dry out.
Some seeds, on the other hand, require dark to sprout. These are usually larger seeds, and want to be deeper in the soil so they don't dry out while small. For most seeds, these need for darkness can be met simply by planting them deeper in the soil and not placing them under your lights until they've come above ground.
A hard seed coat:
Many seeds have very hard seed coats which prevent them from absorbing any water at all -- so while they may be planted in moist soil, on the inside they are as dry as they were in their packet. Over time, this hard coat is slowly broken down by fungi and microbes in the soil, or weakened by passing through the digestive tract of a bird, eventually the water seeps in, and the seed sprouts. This trait seems to be common with large seeded tropical plants like cannas and bananas, and almost universal in plants in the bean family. I used to spend HOURS making little holes in the hard coats of these seeds with a nail file or a sharp knife or nail clippers -- which is horribly tedious -- and often I'd accidentally cut too deep and damage the inside of the seed. Then I learned the easy way: Put the seeds in a bowl. Pour boiling water over them. Wait a few hours, leaving the seeds in the water as it cools. The seeds will swell up much larger than before (like dry beans when you soak them before cooking). If any of the seeds didn't swell up the first time, fish them out, and douse them with boiling water again. It seems extreme, but works like a charm! The packet of canna seeds I ordered this year said they germinate irregularly over a period of weeks or more. I doused them with boiling water, planted them, and 90% were sprouted within a week.
A period of cold temperature (technically, this is called "cold stratification." you may be more familiar with it as: "winter"):
Most seeds ripen in the later summer and fall, but in cold climates, the best time to sprout is in the spring. So many winter hardy perennials, and almost all winter hardy trees and shrubs produce seeds that won't sprout until after they've spent time in cold temperatures. One way to achieve this is to plant the seeds outside in the fall, and let nature take its course -- but in my experience, hungry mice and birds end up taking their course as well -- so I prefer to use my refrigerator. Now, my partner is not too fond of pots of soil and seeds in the fridge (he prefers to keep food in there for some strange reason) so I put my seeds on a couple layers of coffee filter (I used to use paper towels -- but they fall apart too easily. Coffee filters hold up much better. I don't actually drink coffee, so I buy filters just for seed starting) moisten them with water, pop them in a zip-lock bag, write their name and date on the outside, and throw them in the fridge (not the freezer! That's too cold). 3 months in the fridge is enough for most plants, but I check on them every few weeks, when I think about it. If I seed little white roots starting to pop out of the seeds, I pull them out and pot them up.
Those three techniques will allow you to successfully germinate most seeds -- and usually a quick google search with the name of the plant and the word "germinate" will turn up the exact requirements for that specific seed.
But seeds like to keep you guessing... fully three years ago I first placed some Japanese maple seeds in the refrigerator. After three months, I took them out and planted them. One seed sprouted. I thought, okay, bad seeds, and kinda forgot about them. They sat outside that next winter, and the next spring, a dozen more sprouted. There are still a bunch of seeds which look good, so I'm fully expecting another batch to sprout this spring -- who knows how long they will keep it up. Once again, my garden is teaching my patience.
06 March 2009
Starting Seedlings Indoors: Its all about light
It has been warm here (almost 60 degrees today!), the days are getting longer, and the air smells like, well, like SPRING IS COMING! Which means I'm full of pent up gardening energy even though it is far too early to actually be out working in the garden. Thank goodness I have all those seeds I ordered to sow. Otherwise I'd probably start browsing catalogs again and find more plants I can't live without and can't afford.
So I've been starting seeds. Growing your own seedlings for the garden isn't hard, but there is one key feature that a lot of people get wrong: Light. Seedlings need light -- LOTS of it. Too little light causes seedlings to grow long, spindly, and weak – light is what they use to make food, remember. Anorexic seedlings will limp along and the completely collapse when you plant them out into the garden. If you just focus on giving them lots of light, most of the difficulties of seed starting vanish.
There are three simple ways I've used to successfully to give seedlings enough light and let me say now that none of them involve a window sill – even your sunniest windows doesn't have close to enough light – and none of them involve those "light garden" setups you see in garden supply catalogs. The ones I've seen always have too little light, and are way over priced. So here is what does work:
 Desk lamps with compact florescent bulbs:
This is a great, low cost way if you are just starting a few tomatoes or flowers. The secret is to use the brightest bulbs you can and keep the bulbs as close to the plants as possible. Aim to keep the lights on 16 hours a day -- either turn them on and off when you get up and go to bed, or (if you are forgetful like me) get an inexpensive timer to plug them into. Be sure to use compact florescent bulbs -- traditional incandescent bulbs waste energy, get too hot, and produce a lot of a kind of light we can't see called far red, which causes plants to stretch and get spindly rather than stay nice and compact.
Shop lights with florescent bulbs:
This is a step up from the desk lamps, and will allow you to start enough seedlings for a reasonable size gardens. Just be sure not to skimp on the light: for healthy seedlings, you want a minimum of four bulbs right next to each other – the cheapest and easiest way to get that is buy two standards shoplights with 2 bulbs each and hang them right next to each other. Then lower those lights so they almost touch the seedlings so they get as much list as possible. And just buy regular florescent bulbs, not those expensive "plant light" bulbs. Those bulbs are designed to emit light which will make your plants LOOK prettier, but they'll grow just as well under the cheaper, regular florescent bulbs.
High Intensity Discharge Lamps (HID lamps):
These are lights for serious seed starting -- or even for growing tropical plants year round like a mini greenhouse. They will set you back a few hundred dollars or so, but these lights actually produce amounts of light close to sunlight and will grow a lot of beautiful, compact, healthy seedling. Your neighbors may assume you are growing something illegal with it, but they'll change their tune when they see the lovely heirloom tomatoes you get to feast on all summer.
But how much will it cost you to run all these lights? Less than you might think, and the exact amount is easy to calculate for the purposes of convincing skeptical spouses and partners. Your electric bill will have the amount they charge you per "kilowatt hour" -- 1 kilowatt hour is simply 1000 watts of electricity used in one hour. So, to calculate the cost to run your lights simply add up the wattage of the bulbs (for a four bulb, two shop light set up, about 160 watts) divide by 1000 (0.16) multiply by the 16 hours a day it will be on (0.16 x 16 = 2.56) and multiply that by what your electric company charges you per kilowatt hour. My company charges about 8 cents, so those lights would cost me about 20 cents a day to run. Even my 1000 watt high intensity discharge light only costs me about a $1.30 a day -- you can't even buy a cup of coffee for that, and you'll save a LOT more than that by not having to buy seedlings at the nursery.
So invest in some lights, and get some tomatoes growing!
Sources:
For anything except the High Intesity Discharge lights, your best source will be your local home improvement store or hardware store. If you want to bring out the big guns, I recommend Home Harvest. They have tons of lights, and a lot of good information as well.
So I've been starting seeds. Growing your own seedlings for the garden isn't hard, but there is one key feature that a lot of people get wrong: Light. Seedlings need light -- LOTS of it. Too little light causes seedlings to grow long, spindly, and weak – light is what they use to make food, remember. Anorexic seedlings will limp along and the completely collapse when you plant them out into the garden. If you just focus on giving them lots of light, most of the difficulties of seed starting vanish.
There are three simple ways I've used to successfully to give seedlings enough light and let me say now that none of them involve a window sill – even your sunniest windows doesn't have close to enough light – and none of them involve those "light garden" setups you see in garden supply catalogs. The ones I've seen always have too little light, and are way over priced. So here is what does work:
 Desk lamps with compact florescent bulbs:
 This is a great, low cost way if you are just starting a few tomatoes or flowers. The secret is to use the brightest bulbs you can and keep the bulbs as close to the plants as possible. Aim to keep the lights on 16 hours a day -- either turn them on and off when you get up and go to bed, or (if you are forgetful like me) get an inexpensive timer to plug them into. Be sure to use compact florescent bulbs -- traditional incandescent bulbs waste energy, get too hot, and produce a lot of a kind of light we can't see called far red, which causes plants to stretch and get spindly rather than stay nice and compact.
Shop lights with florescent bulbs:
This is a step up from the desk lamps, and will allow you to start enough seedlings for a reasonable size gardens. Just be sure not to skimp on the light: for healthy seedlings, you want a minimum of four bulbs right next to each other – the cheapest and easiest way to get that is buy two standards shoplights with 2 bulbs each and hang them right next to each other. Then lower those lights so they almost touch the seedlings so they get as much list as possible. And just buy regular florescent bulbs, not those expensive "plant light" bulbs. Those bulbs are designed to emit light which will make your plants LOOK prettier, but they'll grow just as well under the cheaper, regular florescent bulbs.
High Intensity Discharge Lamps (HID lamps):
These are lights for serious seed starting -- or even for growing tropical plants year round like a mini greenhouse. They will set you back a few hundred dollars or so, but these lights actually produce amounts of light close to sunlight and will grow a lot of beautiful, compact, healthy seedling. Your neighbors may assume you are growing something illegal with it, but they'll change their tune when they see the lovely heirloom tomatoes you get to feast on all summer.
But how much will it cost you to run all these lights? Less than you might think, and the exact amount is easy to calculate for the purposes of convincing skeptical spouses and partners. Your electric bill will have the amount they charge you per "kilowatt hour" -- 1 kilowatt hour is simply 1000 watts of electricity used in one hour. So, to calculate the cost to run your lights simply add up the wattage of the bulbs (for a four bulb, two shop light set up, about 160 watts) divide by 1000 (0.16) multiply by the 16 hours a day it will be on (0.16 x 16 = 2.56) and multiply that by what your electric company charges you per kilowatt hour. My company charges about 8 cents, so those lights would cost me about 20 cents a day to run. Even my 1000 watt high intensity discharge light only costs me about a $1.30 a day -- you can't even buy a cup of coffee for that, and you'll save a LOT more than that by not having to buy seedlings at the nursery.
So invest in some lights, and get some tomatoes growing!
Sources:
For anything except the High Intesity Discharge lights, your best source will be your local home improvement store or hardware store. If you want to bring out the big guns, I recommend Home Harvest. They have tons of lights, and a lot of good information as well.
Subscribe to:
Posts (Atom)